Was your backyard garden a huge success this year? If so, then congratulations!
If you grew a ton of fresh food this summer, then not only did you save money at the grocery store but you also ensured your family ate nutritious, great-tasting fruits and vegetables with every meal.
But now that the growing season is coming to a close, you may be wondering how to make the abundance of that wonderful, ripe produce last.
Canning is the sensible next step! Canning is for anyone who loves to garden and wants to continue enjoying the many benefits of the hobby throughout the winter months.
Canning is also great for those with less of a green thumb, so long as they are either able to get to a local farmer’s market or they have a neighbor with an overflowing garden.
Content Continues Below ⤵ ↷
Canning is a method that stops the natural spoilage of food. To help you get started, the experts at Tractor Supply Company [1] have compiled a list of pointers that will allow you to hold on to the flavor – and nutritional value – of a homegrown harvest.
Getting started
The initial cost for home canning is minimal and the supplies you do need, like Ball jars, lids and seasonings can be purchased at an affordable cost.
To begin water bath canning, you will need some basic equipment:
- Ball jars with lids and bands [2]
- Large stock pot with jar rack [3]
- Rubber-tipped tongs for gripping the jars in hot water [4]
- Wide mouth funnel for filling jars with foods to be preserved [5]
Tips for beginners
For your first home canning project consider starting with something simple, like a marinara sauce made from leftover tomatoes or diabetic berry jams and jellies [6] made from strawberries [7], blueberries [8]or even apples [9]. When selecting your produce, try to pick ones that don’t show signs of bruising.
One of the most common canning mistakes among beginners is not getting jars to seal properly, which is often the result of a jar that’s either not clean enough or overfilled.
To ensure your jar is sealed, wait at least 12 hours and then simply press your finger into the center of the screwed-on lid-a properly sealed lid will not spring up when you remove your finger. If a lid does not seal within 24 hours, the contents can either be reprocessed or refrigerated.
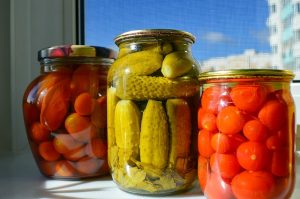
Water bath canning
Water bath canning is a shorter, lower-temperature canning process that works best for foods with high acidity, such as apples, berries, cherries, pears and peaches. Water bath canning works to kill the bacteria that causes food to spoil in the first place, but also creates airtight seals that prevent mold and bacteria from contaminating food down the road.
When it comes to water bath canning, the process is simple. Start by cooking then blanching the desired canning contents. This will help maintain your food’s nutritional value and texture.
Content Continues Below ⤵ ↷
Next, submerge your jars and lids in water and bring to a simmer. Set bands aside. Once removed from the water, use a funnel to fill the jars with the food you’d like preserved before placing the lids back on and putting the jars back into the water. A
llow the jars to process in the boiling water for 10 to 15 minutes, adjusting for altitude. Remove the jars and allow to completely cool for 12 to 24 hours.
Alternative methods
If you’re interested in preserving your harvest but are looking for a less involved process, you may want to consider storing, freezing or drying your fruits and vegetables.
- Storing – Certain fruits and vegetables like apples, potatoes, winter squash, garlic, onions, carrots and cabbage can be stored for months in a basement or root cellar. You simply need to know the storage requirements of each. For example, root crops such as beets and carrots like cool, moist conditions and can be stored in perforated plastic bags in the basement. Potatoes like cold, moist conditions and can be stored in perforated bags in the refrigerator.
- Freezing -Freezing your produce is often the easiest method. Some vegetables, such as tomatoes, can be cut up into chunks and frozen in freezer bags. Most vegetables, though, need to be blanched before freezing. To blanch vegetables, dip them in boiling water for a few minutes and then allow them to cool.
- Drying – Individuals that live in hot, dry climates like the Southwest have the option of drying fruits and vegetables (even herbs) outdoors on drying racks. However, most home gardeners need to use an oven or a dehydrator to dry produce. Dehydrators [11] are specially constructed to maintain the right temperature and air movement necessary for proper drying. If you don’t want to invest in a dehydrator, you can use an oven. Simply set the oven temperature on low and leave the oven door ajar to allow for air movement. And remember to be patient – it may take all day to properly dry some vegetables and fruits.
Tractor Supply [1] carries all of the supplies needed for canning, storing, freezing and drying fruits and vegetables. During the month of October, the rural lifestyle retailer hosts fall Farmers Markets where customers can shop crafts, produce and other local goods.